You’ll master truss drawings by following seven essential steps: start with identifying basic components and symbols, understand the sheet layout and title block details, analyze dimensions and scale, review load requirements, interpret connection specifications, examine configuration notes, and check material requirements. Focus on one element at a time, paying special attention to load capacities and connection details. These fundamentals will help you tackle even the most complex truss designs with confidence.
Identifying Basic Truss Components and Symbols
Successful truss reading starts with understanding the fundamental components and symbols that make up these essential structural drawings.
Understanding truss symbols and components is your gateway to mastering structural drawings and their essential elements.
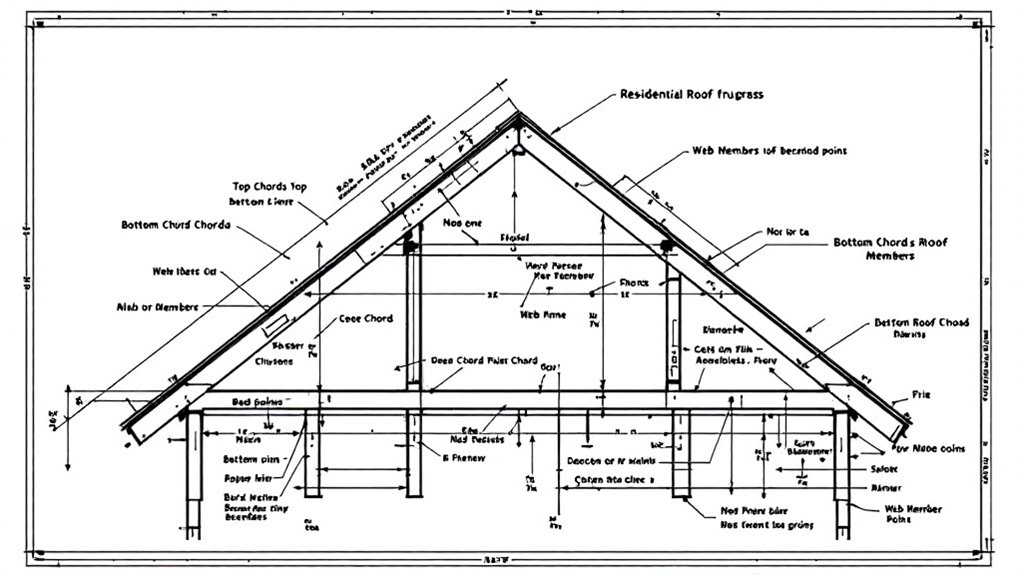
When you’re examining truss types, you’ll notice key elements like top chords, bottom chords, and web members marked by distinct line styles. Look for solid lines representing structural members and dashed lines indicating hidden components.
You’ll find various truss configurations, from simple Fink trusses to complex scissors designs, each marked with specific symbols that indicate their structural integrity requirements.
Pay special attention to connection points, typically shown as dots or circles, and load-bearing symbols that indicate where forces are distributed. Can you spot the bearing points and slope indicators?
Once you’ve mastered these basics, you’ll be ready to tackle more complex truss interpretations with confidence.
Understanding Sheet Layout and Title Block Information
Now that you’ve got the basic symbols down, let’s explore the layout of your truss drawings, starting with the title block!
You’ll find the title block in the bottom right corner, containing vital project details like the job number, client name, and revision dates.
The sheet layout follows a logical arrangement, with general notes and specifications typically positioned at the top left.
You’ll notice the main drawing area dominates the center of the sheet, while detail callouts and section views are placed strategically around it.
Look for the scale information, which is important for accurate measurements, and check the sheet number sequence to verify you’re working with the complete set.
Have you located all these elements on your drawing?
Let’s move on to reading the actual truss configurations!
Analyzing Dimensional Specifications and Scale

When working with truss drawings, correct interpretation of dimensions and scale is absolutely critical for accurate construction!
You’ll need to carefully examine both the stated measurements and the scale representation to guarantee dimensional accuracy throughout your project.
Start by locating the drawing’s scale indicator, typically shown as a ratio (like 1:48) or in fraction format (1/4″=1′). You’ll find this information in either the title block or near the drawing’s borders.
Pay special attention to detail dimensions, which show specific measurements between points, and overall dimensions that indicate total lengths and heights.
Remember to verify that your measurements make sense! Are the truss depths consistent with the specified lumber sizes? Do the panel point dimensions align with the scale shown?
Double-check everything before you proceed with construction.
Reading Load Requirements and Design Criteria
Understanding the load requirements and design criteria is essential for ensuring your truss system can handle all anticipated stresses!
You’ll need to carefully examine the load capacity specifications, which include both dead loads (permanent weight) and live loads (temporary forces).
Start by checking the design standards listed on your drawing, as they’ll indicate the building codes and regulations your truss must meet.
Look for key numbers that show maximum snow loads, wind resistance requirements, and total weight limitations.
You’ll find these details typically marked in pounds per square foot (PSF) or kilonewtons per square meter (kN/m²).
Pay special attention to any notes about special conditions, such as heavy mechanical equipment or unique environmental factors.
Have you considered all possible load scenarios that might affect your truss system’s performance?
Interpreting Connection Details and Hardware

The proper assembly of trusses hinges on your ability to read connection details and hardware specifications correctly!
You’ll need to identify various connection types and understand how different hardware applications work together to create a stable structure. When you’re examining the drawings, pay close attention to the specific symbols and notations that indicate joint configurations.
- Look for metal connector plates (truss plates) and their positioning requirements, which are typically shown with detailed measurements and angles.
- Check fastener specifications, including nail sizes, bolt patterns, and proper placement of hurricane ties.
- Review bearing requirements and anchorage details that show how the truss connects to supporting walls.
Wondering which connections need special attention?
Focus on critical joints where multiple members meet, and always double-check your hardware against the specifications before installation!
Examining Truss Configuration and Assembly Notes
Successful truss assembly requires a thorough examination of configuration details and assembly notes on your drawings!
When you’re reviewing your truss geometry, pay close attention to the overall shape, angles, and member positioning that create the structural framework. You’ll want to carefully note any special conditions or requirements marked on the drawing.
Look for specific assembly procedures that detail the proper sequence of member installation, and don’t skip over those seemingly minor notes! They often contain critical information about temporary bracing, connection methods, and load transfer points.
Have you checked for any particular handling instructions or storage requirements? Understanding these details before you begin will save you time and prevent costly mistakes.
Remember to verify that all dimensions match your project specifications, and if anything seems unclear, always consult your truss manufacturer for clarification.
Reviewing Material Specifications and Special Instructions
Material specifications form the backbone of any successful truss installation, building upon the assembly details we just covered.
You’ll need to carefully review these specifications to guarantee proper material quality and compliance with installation guidelines.
When examining material specifications and special instructions, focus on these key areas:
- Lumber grade requirements, including species type, moisture content, and structural ratings
- Hardware specifications, detailing connector plates, hangers, and fastener requirements
- Special handling instructions, such as bracing requirements and lifting point locations
Pay close attention to any highlighted or boxed notes on your drawings, as they often contain critical information about unique situations or regional requirements.
Have you double-checked that all materials match the specifications?


